How to set up a VPN server using WireGuard (with NAT and IPv6)

How to set up a VPN server using WireGuard (with NAT and IPv6)

WireGuard is a fast and modern VPN protocol.

It is a point-to-point VPN, which means it does not have a client-server architecture but peers, and does not rely on a PKI, unlike OpenVPN. It is super simple to set up to connect multiple machines together.

WireGuard supports roaming, which means you can switch between network connections and not have to reconnect to your peers. On servers, it's rarely useful, but when one of the peers is a mobile client like a laptop or a smartphone, it's a lifesaver because the usage of WireGuard is completely transparent.

I'm used to OpenVPN, I even maintain a quite popular script, but WireGuard is better in pretty much all aspects.

In this post, I will explain how I use WireGuard on my laptop and phone, which forward all their traffic to the server while having dual-stack connectivity.

The setup is pretty simple: we have 2 peers, one server, and one client. Connecting both in a private subnet is easy. The trick to make use of the VPN to forward all of the client's traffic through the server is to:

  1. Make the client's WireGuard interface its gateway (default route)
  2. Enable IP routing on the server
  3. Enable NAT between the WireGuard interface and the public interface on the server

We will see how to add multiple clients at the end of the tutorial.

Ready?

Installing WireGuard#

WireGuard comes in two parts: the tools, which will allow us to manage the peers and interfaces, and the Linux kernel module. On other platforms such as macOS, non-rooted Android, and FreeBSD, the module is replaced by a userspace Go implementation.

FYI, it is planned for the WireGuard module to be integrated into the Linux kernel itself.

WireGuard can run nearly anywhere; all the installation notes are on the website.

I'm usually using Debian 9 or Ubuntu 18.04 on my servers. On Debian, you need to install it from the unstable repository, and on Ubuntu from a PPA.

I recommend the cheapest VM from Hetzner Cloud or Vultr. You should choose the location that is the closest to you. Both support IPv6.

As for my clients, I use the macOS Go client, the Arch Linux build from the community repo, and the Android app.

Edit: I use the excellent GUI client for macOS now!

Configuring WireGuard#

Here are the steps:

  • Add the WireGuard interface on the server
  • Add the WireGuard interface on the client
  • Add the server as a peer on the client
  • Add the client as a peer on the server
  • Tune the configuration to make the client's traffic go through the server

Configuring the WireGuard interface on the server#

The configuration of WireGuard lives in /etc/wireguard.

We'll call our interface wg0, so the config file will be /etc/wireguard/wg0.conf.

First, let's assign IP addresses from a private subnet:

[Interface]
Address = 10.66.66.1/24,fd42:42:42::1/64

Then, let's define the port WireGuard will be listening on:

ListenPort = 1194

Then, let's generate a private key. WireGuard uses simple Curve25519 public and private keys for cryptography between the peers.

root@wg ~# wg genkey
AMfhWQnwtdht5HWGcW6se4AtBzb9iyTtX4XRKLo3o0A=

Add it to the configuration:

PrivateKey = <server private key>

We're done!

[Interface]
Address = 10.66.66.1/24,fd42:42:42::1/64
ListenPort = 1194
PrivateKey = <server private key>

You have two ways of starting the interface.

The manual way is with wg-quick:

root@wg ~# wg-quick up wg0
[#] ip link add wg0 type wireguard
[#] wg setconf wg0 /dev/fd/63
[#] ip address add 10.66.66.1/24 dev wg0
[#] ip address add fd42:42:42::1/64 dev wg0
[#] ip link set mtu 1420 up dev wg0

You can remove the interface with:

root@wg ~# wg-quick down wg0
[#] ip link delete dev wg0

I recommend using the systemd service and enabling it:

systemctl start wg-quick@wg0
systemctl enable wg-quick@wg0
root@wg ~# systemctl status wg-quick@wg0
â—Ź wg-quick@wg0.service - WireGuard via wg-quick(8) for wg0
   Loaded: loaded (/lib/systemd/system/wg-quick@.service; indirect; vendor preset: enabled)
   Active: active (exited) since Sun 2019-01-27 11:43:19 UTC; 1min 1s ago
     Docs: man:wg-quick(8)
           man:wg(8)
           https://www.wireguard.com/
           https://www.wireguard.com/quickstart/
           https://git.zx2c4.com/WireGuard/about/src/tools/man/wg-quick.8
           https://git.zx2c4.com/WireGuard/about/src/tools/man/wg.8
 Main PID: 7512 (code=exited, status=0/SUCCESS)
    Tasks: 0 (limit: 505)
   CGroup: /system.slice/system-wg\x2dquick.slice/wg-quick@wg0.service

Jan 27 11:43:19 wg systemd[1]: Starting WireGuard via wg-quick(8) for wg0...
Jan 27 11:43:19 wg wg-quick[7512]: [#] ip link add wg0 type wireguard
Jan 27 11:43:19 wg wg-quick[7512]: [#] wg setconf wg0 /dev/fd/63
Jan 27 11:43:19 wg wg-quick[7512]: [#] ip address add 10.66.66.1/24 dev wg0
Jan 27 11:43:19 wg wg-quick[7512]: [#] ip address add fd42:42:42::1/64 dev wg0
Jan 27 11:43:19 wg wg-quick[7512]: [#] ip link set mtu 1420 up dev wg0

Thus, the interface will be automatically added at boot.

You can see the interface status and the public key with wg show or wg:

root@wg ~# wg show
interface: wg0
  public key: <server public key>
  private key: (hidden)
  listening port: 1194

Configuring the WireGuard interface on the client#

The configuration on the client is essentially the same.

Generate a private key with wg genkey, and assign addresses:

[Interface]
PrivateKey = <client private key>
Address = 10.66.66.2/24,fd42:42:42::2/64

Put this in /etc/wireguard/wg0.conf, and start the interface:

stanislas@mbp ~> wg-quick up wg0
[#] wireguard-go utun
...
INFO: (utun1) 2019/01/27 14:36:58 Starting wireguard-go version 0.0.20181222
[+] Interface for wg0 is utun1
[#] wg setconf utun1 /dev/fd/63
[#] ifconfig utun1 inet 10.66.66.2/24 10.66.66.2 alias
[#] ifconfig utun1 inet6 fd42:42:42::2/64 alias
[#] ifconfig utun1 up
[+] Backgrounding route monitor

Here I'm using it on macOS, so the interface name is utun1.

Edit: I use the excellent GUI client for macOS now!

Configuring peers#

Now that our interfaces are up, let's configure the peers. It will allow us to make our server and our client communicate.

On the client, add this:

[Peer]
PublicKey = <server public key>
Endpoint = <server public ip>:1194
AllowedIPs = 10.66.66.1/32,fd42:42:42::1/128

Thanks to this, all the packets destined for AllowedIPs will be encrypted with PublicKey and sent to Endpoint.

On the server, it's basically the same, with the client private IP and without the endpoint:

[Peer]
PublicKey = <client public key>
AllowedIPs = 10.66.66.2/32,fd42:42:42::2/128
Wait... No endpoint? But wasn't this supposed to be a point-to-point server?

Yes! But WireGuard supports roaming on both ends, and that's what allows us to have peers on the server without endpoints. As long as the peers (the clients) have the initial endpoint of the server, the server will know where to send the packets back because the client's endpoints will be built dynamically.

From the WireGuard website about built-in roaming:

The client configuration contains an initial endpoint of its single peer (the server), so that it knows where to send encrypted data before it has received encrypted data. The server configuration doesn't have any initial endpoints of its peers (the clients). This is because the server discovers the endpoint of its peers by examining from where correctly authenticated data originates. If the server itself changes its own endpoint and sends data to the clients, the clients will discover the new server endpoint and update the configuration just the same. Both client and server send encrypted data to the most recent IP endpoint for which they authentically decrypted data. Thus, there is full IP roaming on both ends.

I hope that makes sense. Keep in mind that WireGuard does not create a tunnel like OpenVPN does, but each packet is encapsulated right away.

Now, restart the WireGuard interface on the server and the client. The server does not know how to connect to the client, so the client should send a packet first.

When restarting the interface, here on the client, we can see that WireGuard added a route:

stanislas@mbp ~> wg-quick up wg0
...
[#] route -q -n add -inet 10.66.66.1/32 -interface utun1
...
stanislas@mbp ~> ip r | grep utun1
10.66.66.1/32 via utun1 dev utun1

We can see the new peer:

stanislas@mbp ~> sudo wg show
interface: utun1
  public key: <client public key>
  private key: (hidden)
  listening port: 52926

peer: <server public key>
  endpoint: 95.179.208.197:53
  allowed ips: 10.66.66.1/32, fd42:42:42::1/128

Let's try connecting to it:

stanislas@mbp ~> ping -c 4 10.66.66.1
PING 10.66.66.1 (10.66.66.1): 56 data bytes
64 bytes from 10.66.66.1: icmp_seq=0 ttl=64 time=21.291 ms
64 bytes from 10.66.66.1: icmp_seq=1 ttl=64 time=12.305 ms
64 bytes from 10.66.66.1: icmp_seq=2 ttl=64 time=10.954 ms
64 bytes from 10.66.66.1: icmp_seq=3 ttl=64 time=12.284 ms

--- 10.66.66.1 ping statistics ---
4 packets transmitted, 4 packets received, 0.0% packet loss
round-trip min/avg/max/stddev = 10.954/14.209/21.291/4.126 ms

stanislas@mbp ~> ping6 -c 4 fd42:42:42::1
PING6(56=40+8+8 bytes) fd42:42:42::2 --> fd42:42:42::1
16 bytes from fd42:42:42::1, icmp_seq=0 hlim=64 time=10.428 ms
16 bytes from fd42:42:42::1, icmp_seq=1 hlim=64 time=10.541 ms
16 bytes from fd42:42:42::1, icmp_seq=2 hlim=64 time=10.626 ms
16 bytes from fd42:42:42::1, icmp_seq=3 hlim=64 time=10.843 ms

--- fd42:42:42::1 ping6 statistics ---
4 packets transmitted, 4 packets received, 0.0% packet loss
round-trip min/avg/max/std-dev = 10.428/10.610/10.843/0.152 ms

Success!

On the server, you should see that data has been transmitted, and you should also see that a dynamic endpoint is shown:

root@wg ~# wg
interface: wg0
  public key: <server public key>
  private key: (hidden)
  listening port: 53

peer: <client public key>
  endpoint: <client's router public IPv4>:52926
  allowed ips: 10.66.66.2/32, fd42:42:42::2/128
  latest handshake: 2 minutes, 43 seconds ago
  transfer: 1.05 KiB received, 988 B sent

The endpoint is the client's public IP address (the router's, if it is behind NAT), and, as we did not set a port nor an endpoint, a random port.

You can try to ping your client from the server; it should work (if the client's firewall is not blocking incoming connections).

Now that our two peers can communicate, let's make all of our client's traffic go through the server.

Forward the traffic of the client through the server#

Enable routing on the server#

First, we need to enable IPv4 and IPv6 routing on the server so that it can forward packets.

echo "net.ipv4.ip_forward = 1
net.ipv6.conf.all.forwarding = 1" > /etc/sysctl.d/wg.conf

sysctl --system

Enable NAT on the server#

We want to enable NAT between the server's public interface (ens3 for me) and the wg0 interface.

For that, we need two iptables commands:

iptables -t nat -A POSTROUTING -o ens3 -j MASQUERADE
ip6tables -t nat -A POSTROUTING -o ens3 -j MASQUERADE

The good news is that WireGuard can execute these for us when the interface is brought up. To keep things clean, we want to remove them when the interface is brought down, so here is what you need to add to your [Interface] block on the server:

PostUp = iptables -t nat -A POSTROUTING -o ens3 -j MASQUERADE; ip6tables -t nat -A POSTROUTING -o ens3 -j MASQUERADE
PostDown = iptables -t nat -D POSTROUTING -o ens3 -j MASQUERADE; ip6tables -t nat -D POSTROUTING -o ens3 -j MASQUERADE

That's it!

Make the server the client's gateway#

We can leverage the AllowedIPs option to override the default route on the client.

Simply change the line to:

AllowedIPs = 0.0.0.0/0,::/0

Restart the interface. Done, all of your client's packets are going through the server!

Adding more clients#

Adding more clients is a breeze.

The third peer's configuration file will look like this:

[Interface]
PrivateKey = <client 2 private key>
Address = 10.66.66.3/24,fd42:42:42::3/64

[Peer]
PublicKey = <server public key>
Endpoint = <server public IP>:1194
AllowedIPs = 0.0.0.0/0,::/0

On the server:

[Peer]
PublicKey = <client 2 public key>
AllowedIPs = 10.66.66.3/32,fd42:42:42::3/128

Note that the clients won't have the other clients as peers since they don't have valid initial endpoints (= a public IP address and open/forwarded port).

Tips and tricks#

Verifying your connection#

I usually use ipv6-test.com or ipleak.net to verify that my traffic is going through the VPN, including IPv6.

Generate a public key from a private key#

If you need to get the public key from a private key, you can pipe the private key to wg pubkey like:

wg genkey | wg pubkey

To get a pair in two files:

wg genkey | tee privatekey | wg pubkey > publickey

Or in your terminal output:

private_key=$(wg genkey)
public_key=$(echo $private_key | wg pubkey)
echo "private key: $private_key"
echo "public key: $public_key"

IPv4, IP6, dual stack...?#

Here, we use a dual stack VPN, and the peers connect via IPv4.

I prefer the endpoints to be IPv4 since sometimes I am on IPv4-only network but you could connect to your server via IPv6.

The private addresses could also be IPv4 only or IPv6 only, but dual stack is the best!

Changing the client's DNS resolvers#

A little tip if you want to change your client's DNS resolvers upon connection. There are many reasons to do this:

  • With the new routes, your local network won't be accessible. So if the DNS servers pushed by your DHCP server are in the local network, you're screwed. (Or you add the correct route with PostUp on the client)
  • You want to use a private/self-hosted DNS server, like Pi-hole
  • You want to use a specific DNS server on a platform where you can't without a VPN, like Android

As for me, I currently put Adguard DNS everywhere. It's especially useful on my Android phone where I don't have an ad blocker.

To specify DNS servers, add the DNS option to the client's [Interface] block:

[Interface]
...
DNS = 176.103.130.130,176.103.130.131

Bypassing blocked ports and filtered connections#

WireGuard uses UDP. A well-known way to bypass blocked ports with OpenVPN is to use TCP on port 443 to simulate HTTPS, but it's slower.

On both OpenVPN and WireGuard, I usually connect to port 53 via UDP, since DNS is never blocked (unless your network does DPI...).

Transferring a configuration file easily to the Android app#

I mean it's not that difficult to transfer a file from my computer to my Android phone, but there is an even better way.

On the Android App, you have 3 means to create an interface:

  • Create from file or archive
  • Create from a QR Code
  • Create from scratch

It's super easy to generate a QR Code on your computer using qrencode:

qrencode -t ansiutf8 < wireguard-android.conf

Scan the QR Code in your terminal with your phone, and you're done.

Configuration overview#

It's been a long post, so let's see how our configuration files look by now.

Peer 1 (server)#

[Interface]
Address = 10.66.66.1/24,fd42:42:42::1/64
PostUp = iptables -t nat -A POSTROUTING -o ens3 -j MASQUERADE; ip6tables -t nat -A POSTROUTING -o ens3 -j MASQUERADE
PostDown = iptables -t nat -D POSTROUTING -o ens3 -j MASQUERADE; ip6tables -t nat -D POSTROUTING -o ens3 -j MASQUERADE
ListenPort = 53
PrivateKey = <server private key>

[Peer]
PublicKey = <client 1 public key>
AllowedIPs = 10.66.66.2/32, fd42:42:42::2/128

[Peer]
PublicKey = <client 2 public key>
AllowedIPs = 10.66.66.3/32, fd42:42:42::3/128

Peer 2 (client 1)#

[Interface]
PrivateKey = <client 1 private key>
Address = 10.66.66.2/24,fd42:42:42::2/64
DNS = 176.103.130.130,176.103.130.131

[Peer]
PublicKey = <server public key>
Endpoint = <server public IP>:53
AllowedIPs = 0.0.0.0/0,::/0
Peer 3 (client 2)#

[Interface]
PrivateKey = <client 2 private key>
Address = 10.66.66.3/24,fd42:42:42::3/64
DNS = 176.103.130.130,176.103.130.131

[Peer]
PublicKey = <server public key>
Endpoint = <server public IP>:53
AllowedIPs = 0.0.0.0/0,::/0
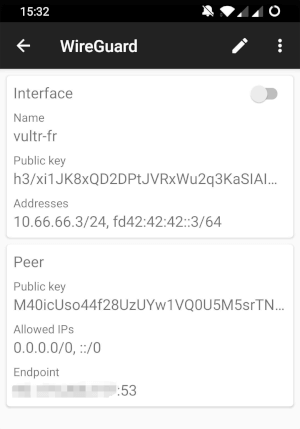
This is how it looks in the app

Conclusion#

WireGuard is super awesome and easy to set up.

Thanks to this, I can connect safely (encryption) from nearly anywhere (port 53), get IPv6 connection (dual-stack) while blocking ads (AdGuard) and having great speeds!

WireGuard is still being actively developed, and has received lots of support and donations. I have been using it for months to connect servers to each other (blog post incoming), and I never had any issue.

Enjoy!

Stanislas
Author
Stanislas
I like building things with code and computers

Comments

100Atom feed
Markdown supported
  1. John

    I currently use OpenVPN on my PiHole machine to add mobile ad-blocking. However, I don't send all traffic through the tunnel, only DNS queries, is this possible with WireGuard also?

  2. Vic

    Salut! First of all, thank you for the great and detailed guide! I had one question though! I was wondering how you got the second client to connect to the server using the AllowIPs=0.0.0.0 option on both clients? I could only get one of the two clients to connect when I was trying to get it working. Merci beaucoup!

    1. StanislasAuthor

      That's weird! The AllowedIPs option means that all traffic to AllowedIPs will go to the peer, in our case the server. As long as on the server, the AllowedIPs of the clients are only their private IP address, you should not have any issue.

    2. Vic

      Ahhhh I figured out my issue. It wasn't based on the AllowedIPs setting on the client, but on the AllowedIPs setting on the server. I had to made the server AllowedIPs for each peer to be 10.200.0.2/32 and on the client side, I had to give the Address field for the Interface block to be 10.200.0.2/24. The issue that I had was that previously both were on the /24 subnet. I'm not sure yet why the AllowedIPs for the peer needs to be on /32, but I'll look into it further. Thanks for your help! :)

    3. Vic

      I understand now!! The CIDR of /32 on the server side config limits the client to the specific IP of 10.200.0.2! Merci pour ton aide!

    4. Aaron

      Can you post your .conf files, both Server and Client?

  3. Bas

    Great tutorial Angristan! One question, while I succesfully connect the vpn between the client and the server, I can not reach the internet using normal browser on a client (client has allowedIPs 0.0.0.0/0 -ie forwarding everything). How do I pass along the new gateway upon connecting and where (client or server side?)?

    1. StanislasAuthor

      That's curious, can you ping the wg IP of the server from the client?

    2. Anonymous

      Thanks for your quick reply. I managed to fix it - I used the native MacOS app to connect from client side and that passed along incorrect gateway ip routes. Having now replaced the MacOS app with the command line tools solved the problem. Now it works like a dream - and is exactly in line with your guide above. Once again, thanks for clear instructions!

    3. Anonymous

      Hey Angristan, i have deployed wireguard on a ubuntu box in aws with a public ip address. i have downloaded wireguard client on android device and im able to successfully connect. I have done a telnet test from my android device to the private ip of my ubuntu box and im able to connect. The problem i have is, when i open IPchicken or similar tool on my android box i expect to see my ubuntu box public IP address and this is not happening.....can you help me resolve that issue pls!

  4. Rene

    I am going to try this for sure.

  5. Skid

    Should be a good idea to add theses rules for peoples who have a restrictive firewall by default ^^'

    iptables -A FORWARD -s 10.66.66.0/24 -j ACCEPT ; iptables -A FORWARD -m state --state RELATED,ESTABLISHED -j ACCEPT

    ip6tables -A FORWARD -s fd42:42:42::/64 -j ACCEPT ; ip6tables -A FORWARD -m state --state RELATED,ESTABLISHED -j ACCEPT

  6. Harry

    Using Dns is very important on iOS

  7. Paulo

    Many thanks for your amazing detailed guide. I need to replace a openvpn site-to-site for the wireguard. I have 2 rpi running raspbian. Both rpi are not gateway. How can a do this with wireguard? So all the devices on both remote sides can see each others on the other side?

  8. Jack

    Thanks for your guide, was very helpful

  9. Derek

    I do have my private DNS servers in my lan, and I really want to be able to access internal IP addresses. I suck with IPTables, so how would one go about allowing the client to access local IPs behind the server?

  10. Dan

    Hi angristan, Thank you very much for your tutorial and the script https://github.com/angristan/wireguard-install ! It's just amazing how quickly you can set up wireguard grâce à toi. One question though, do you have any ideas why ipv6-test.com does not show an IPv6 connectivity, my VPS having both an IPv4 and IPv6 connection and internally "ping6 -c 4 fd42:42:42::1" is working?

    1. Galeej

      I have same issue, were you able to figure it out?

    2. paper

      I don't think I know exactly why it is, but I have a clue for you. If you configure a global unicast as the out IP address, it will work. This way browsers prefer IPv4 connection over IPv6.

    3. Testv6

      I am wondering if http://ipv6-test.com (accessed directly not via VPN) shows no IPv6 support, if that means V6 can not work on client in regular approach and if so, what is the workaround (if any) so the client is reachable on servers IP6.

  11. holzbalken

    Hello Mr. Stanislas, i had some problems using your script , but finally succeeded with following improvments:

    a) wireguard IP-net: if you use the 10.66.66.0 tunnel adress, you´ll might get in trouble with local nets ( including openvpn-nets,wlan nets,...) , as traffic will get wrong routed. It´s a nightmare to follow that fault.

    Solution: according to RFC 6598 the there are reseved Carrier-Grade-NAT Adressspace noted as 100.64.0.0/10. of course you won´t need a /10 net . Just use /24 adress space. This adressspace will never be publicly assigned nor be assigned as wlan adress-space.

    b) If you use your script "wireguard_install.sh" the wireguard kernel modul will not be loaded into the kernel, as the "Linux header packages" is not installed on a fresh cloud-machine debian. Symptome: no output after

    lsmod | grep wireguard

    solution: Include "apt-get install linux-headers-$(uname -r)" right before your "apt install wireguard" and all is done.

    best regards and you´ll deserve my personal 5-star rank

  12. Ravi

    Everything works great, But when I block some website (for eg. google.com) on server side It still runs on client??

  13. Me

    Nice tutorial! However I had some problems on getting Wireguard to run on port 53 due to systemd-resolv already using it.

    1. Anonymous

      How did you solve?

  14. Anonymous

    Hello.Thanks for this clarifying guide, it helps a lot.I think there is a typo (where it reads "client 2 public key" it shoud read "client 2 private key"). Quoting:The third peer's configuration file will look like this:[Interface] PrivateKey = <client 2 public key>

  15. Galeej

    My ISP supports IPv6 and I have setup PiHole as DNS which supports IPv6 too. I used the install script and when I test using ipv6-test.com, it says IPv6 not supported. Do I need to use IPv6 in the endpoint instead of IPv4 on the client conf.

    1. paper

      IPv6 works, but it is not advertised by browsers. For more information see above.

  16. Eric

    thanks for the instruction , but I have some problem with NAT

    I want to build multiple site to site VPN . so far , I try wireguard in 3 nodes for now

    a. wg0: 10.0.0.40 , lan: 192.168.40.4 , b. wg0: 10.0.0.28 , lan: 192.168.28.4 , C.wg0: 10.0.0.80 , lan: 192.168.80.4

    now , I can ping from nodes to nodes (10.0.0.x) , but can not get clients behind nodes (192.168.x.x) to communicate to each other

    I already add the iptables commands in wg0.conf as the instruction.

    how should I modify the iptables??

    any suggestions ?

  17. gawa

    I looked around and found that the guy behind wireguard, Jason A. Donenfeld, is quite helpful with the BSD community. He helped on the FreeBSD mailing list for the port of wireguard-go (userspace) and on the OpenBSD mailing list for a kernel module. The most advanced kernel module I found so far was for NetBSD though. It's also in the roadmap for NetBSD 9 as "Nice to have"

    It looks like the BSD folks tend to share a different conception of the separation between kernel and userspace. On the userspace front, openbsd didn't waste time, they wrote WireSep leveraging their pledge() system call.

    There's also a userspace implementation in Rust by CloudFlare, BoringTun, licenced under the BSD 3-clause.

  18. DJMatus23

    Thank you, this helped me loads. I struggled through some DNS business, but that wasn't so bad.

  19. Anonymous

    Only want to say that's a very good guide. And give you thanks!

  20. Anonymous

    Dears, I meet a problem : after installation success the wireGuard, the first connect on the iPhone client is working fine, when i disconnect and connect the wireGuard on the iPhone cliecnt after 30 min, although it show connect succes on the app side, but all the web side can not access, i check the log in the app show like:Handshake did not complete after 5 seconds, retrying (try 2) i only can ssh to the vps ,then run wg-quick down wg0 and wg-quick up wg0, then it can continue to access the website. it there any better solution for this? or is there any configuration i missed? pls help. thx

    1. PRAVEEN PRABHAKARAN

      This was my problem. then i installed bind on server as a forwarder and cache. Give this DNS to Client. it will work.

  21. lukas

    First, thank you, your installer is the only one that works for me. :) Second, there is noticeable speed (first byte impression) if I use Cloudflare DNS rather than Adguard DNS

  22. PRAVEEN PRABHAKARAN

    I made Client Setup from your code. Thanks! Now i can add any number of users it will add it to Interface of server. One more thing i noticed was when we make a connection via mobile it was slow to get queries forwarding to another websites. DNS leakage was there upon testing. I put 8.8.8.8 on Interface of Client DNS on mobile. So It is passing through ISP. After realizing I installed bind (named) DNS as cache and forwarder in Server of UPCLOUD (where my server resides on CentOS 7 as VPS) and gave this Server eth0 DNS to Client Interface of DNS in mobile. Now Wireguard works great! Speed is awesome! DNS query works like a charm! No DNS leakage and it only pass through Wireguard Server of UPCloud. So wonderful!

  23. emad

    Hi, How can I tunnel wireguard traffic over TCP? Thank you, Best

  24. Anonymous

    Hi Angristan, your Tutorial is very great; could you make an tutorial "How to update an Wireguard on an Raspi!", please?

    1. StanislasAuthor

      A simple sudo apt update && sudo apt full-upgrade is enough.

    2. Mraashole

      dude I want to setup wireguard. But don't know shit about it. Can you make a video to how to install wireguard ?

  25. oof

    Great guide. I was having trouble tunneling IPv6 and this set me straight. Thanks.

  26. Mahdi

    Hi I tend to use wireguardAnd I want to run it on my own Linux serverAnd use it on windows.ButEverything I tried to run wireguard on my Linux server failedAnd the problem is that when I connect to wireguard in Windows or iPhone I don't get any data and my connection to the internet is cut offand cant ping server.Thanks for guiding me on how to run wireguard on my server and can use it on windows. Client: [Interface]PrivateKey = wHGyrSIg4z2ahkYGu8aqQMsdhKmRWb897Sm9X3Vh4lk=Address = 10.9.0.2/24, fd42:42:42::2/64DNS = 8.8.8.8 [Peer]PublicKey = j8Zj52IN7Ag776gywlxmXQNCxnOx5D3zvW/j6FI7eg8=AllowedIPs = 0.0.0.0/0, ::/0Endpoint = 104.248.28.23:2408 Server: [Interface]Address = 10.9.0.1/24,fd42:42:42::1/64ListenPort = 2408PrivateKey = KFcwmREY3ZZyH8eNSTsKuFJb7058hQFXqW4/TE3OnV8=PostUp = iptables -A FORWARD -i wg0 -j ACCEPT; iptables -t nat -A POSTROUTING -$PostDown = iptables -D FORWARD -i wg0 -j ACCEPT; iptables -t nat -D POSTROUTING$[Peer]PublicKey = 5eVlAyYdv3LMp6Jpqy/yCwfkieoyuboal4DyJt2kFXA=AllowedIPs = 10.9.0.2/32,fd42:42:42::2/128

  27. Anonymous

    Hi, may i ask that the IP adress we can choose any or from a range?

  28. SHADOW

    great guide! What about DPI? Do you have a trick for it?

    1. StanislasAuthor

      I didn't research DPI with WG. I guess WG is a bad fit for this since it's UDP.

  29. Marc

    Hi Angristan,

    Thank you for the great tutorial on how to get Wireguard up and running. I use WG on a Raspberry Pi at home to access my home network from the road. I still have one problem though:

    When I try to connect from an IPv6-only network (Dual Stack Lite,... About 50 customers of the ISP share one Public IPv4), I can connect, but I can't reach the devices on my LAN. Do you have any idea what could be going on there? Thanks in advance for your help

    here are the configs:

    SERVER

    [Interface] Address = 10.10.10.1/24, fd42:42:42:42::1/64 ListenPort = 1195 PrivateKey = Private Key of the Server PostUp = iptables -A FORWARD -i %i -j ACCEPT; iptables -A FORWARD -o %i -j ACCEPT; iptables -t nat -A POSTROUTING -o eth0 -j MASQUERADE; ip6tables -A FORWARD -i %i -j ACCEPT; ip6tables -A FORWARD -o %i -j ACCEPT; ip6tables -t nat -A POSTROUTING -o eth0 -j MASQUERADE PostDown = iptables -D FORWARD -i %i -j ACCEPT; iptables -A FORWARD -o %i -j ACCEPT; iptables -t nat -D POSTROUTING -o eth0 -j MASQUERADE; ip6tables -D FORWARD -i %i -j ACCEPT; ip6tables -D FORWARD -o %i -j ACCEPT; ip6tables -t nat -D POSTROUTING -o eth0 -j MASQUERADE

    [Peer] PublicKey = Public Key of Client1 AllowedIPs = 10.10.10.5, fd42:42:42:42::5

    CLIENT

    [Interface] PrivateKey = Private Key of Client1 Address = 10.10.10.5/24, fd42:42:42:42::5/64 ListenPort = 1195 DNS = 1.1.1.1, 2606:4700:4700::1111 [Peer] PublicKey = Public Key of the Server Endpoint = <Pv6 address / Hostname of Raspi (ipv6 and ipv4). # Tried both AllowedIPs = 0.0.0.0/0, ::/0 PersistentKeepalive = 25

    The Client is a Linux Device running Linux Mint 19.3

  30. Lance

    This is the best post I've seen on WG. The key to making this easier to understand is by keeping the context intact every time you show an example. For instance, when you describe how to set the DNS, you make it clear that it is on the interface side.

  31. Carl

    Great info on Wireguard. Thanks! Is there a way to list some comment in config that will show the client name when doing a wg show? It is hard to know which clients are active etc without some info here. Can each Peer be labeled somehow?

  32. Luiz

    Amazing tutorial man! Objective and easy to understand, thanks for sharing!

  33. Angga

    Hello angristan.... Great tutorial on how to setup wireguard VPN. I successfully forward my connection through wireguard server. But i had issue here, i use ufw firewall activated and already add allowing dns port (53) to ufw, but dns cannot resolved on client.... How to fix this problem?

  34. Paul

    Thanks for the tuts, to add peers in wireguard conf file /etc/wireguard/wg0.conf, generate a public and private for each client then run this on terminal: (Note: use the client public key as shown) wg set wg0 peer xftHHHSS(S(S(DSHDS8**uUUUuur86ufu6j= allowed-ips 10.66.66.3/32, fd42:42:42:3/128

  35. eko

    Hi. Thanks for the fantastic work in openvpn script. I use it without any troubles even with multiple interfaces (including wireguard, manually configured). I just knew that you created wireguard script too. I will try the script you made because for me adding more users manually is not instant. By the way, I would like to ask about multiple peers in android wireguard config. It means that our device connect to several servers at a time? And what we achieve by doing it?

    Regards

  36. Darell

    Will this work with an ubuntu server on my network with a VPN service? My slow performance on OpenVPN is a pain. I was hoping i can put a wireguard client on my pihole client so that my devices then get VPN service.

    1. DaveCole

      Wireguard works fine on Ubuntu 18.04. NordVPN has just started a Wireguard service. That should work!

  37. anon

    hello, im using the conf from wireguardconfig.com. it works well with devices in the same network. but when i tried to use wireguard(using pi hole as dns) with my mobile data, the internet doesnt connected at all. do you have any idea why?

    1. Benja

      Hla anon, no conocĂ­a esa web. Voy a probarlo y te aviso

  38. screwfox

    Hi, fantastic script. Working fine on my kvm ps. Any chance of extending this to get it to work on openvz? Using 'go' or maybe the boringtun implementation?

    1. Cagdas

      it also works very well with KWM. Will there be a version for OpenVZ?

  39. JB

    Thank you for your guide, but I can start to ping among PCs in VPN ie.10.66.66.2 and 10.66.66.3. I tried to give PostUp = iptables -A FORWARD -i %i -j ACCEPT; but no success. What do you suggest?

  40. Vlad

    Thanks for the great explorations and for the install script, really easy to add new peers.

    Everything works as expected, peers connected can access the local network. I do however have a question, are you familiar with docker and macvlan networks? I have a container connected to a macvlan network (to be directly attached to my main network) however connected peers can't access this container. Any ideea?

  41. Aura

    Hello,

    There is an error in your "OpenVPN" file on GitHub. Installation is done, connection is provided with the file. However, internet cannot be accessed.

    I tried another developer's script to find out that the problem was not caused by the server. And I saw it working. However, so there seems to be a problem with your script.

  42. Spyros

    Hi. I follow your guide to make wiregurd works but the PostDown command in wg0.conf doesn't work. I have the following error and i can't delete it: [#] ip link delete dev wg0 [#] iptables -t nat -D POSTROUTING -o enp2s0 -j MASQUERADE iptables: Bad rule (does a matching rule exist in that chain?). Any idea to fix it. Thanks Spyros

  43. seb

    Salut,

    j'ai mis pivpn sur mon rpi4 (raspi-os), pas de problème pour faire fonctionner wireguard avec un endpoint sur l'adresse ip publique lors de la configuration des clients, mais impossible de connecter le client (déjà rien qu'en local) si j'ai mis mon ddns (dynhost chez ovh) à la place...ce n'est donc pas un problème de ports (j'ai essayé avec un client linux et 2 clients android), mais bien de dyndns

    Je remarque également que le client ne se connecte jamais sur le port renseigné pendant la conf serveur (51820) mais toujours sur un port aléatoire

    Pourtant, le dyndns pointe bien sur mon adresse ip publique de ma box, as-tu déjà eu ce problème ?

    Cordialement

  44. Kiki

    Just to say after 3 weeks of trying with multiple windows server and openvpn tutorials as well as some other wireguard's this works. Finely. Thank you!

  45. Sunvas

    Is it possible to configure IPv6 without NAT?

  46. Witit

    I use your scrip to install wireguard on my vultr ipv6 only vps. After some struggling to get ipv6 networking works, I could use wg to work to access websites through the server but very slow. After changing the AllowedIps to 10.66.66.2/32, fd42:42:42::2/128, everything works perfectly. So it means I cannot use my server as gateway by using AllowedIps 0.0.0.0/0, ::/0? May be something still not right on my server network configuration?

    1. Witit

      Additional note: Changing AllowedIps to 66..,fd42.. on client connecting to my ipv4 server on gce also improve connection speed significantly.

    2. Witit

      Just realized that changing the AllowedIps to 66.., fd42.. will not tunnel traffic through we server. That's why it's fast. I'm back to square one.

  47. Khoa Vo

    With the new routes, your local network won't be accessible. So if the DNS servers pushed by your DHCP server are in the local network, you're screwed. (Or you add the correct route with PostUp on the client)

    Are you sure that's the reason? In my laptop I have a route to the local DNS server like "192.168.0.1/32", so it overwrites any route from wireguard config. However, I still can't use the local DNS server. I can still "dig" from that server, though.

  48. nick

    Thanks alot for this, I tried a dockerized solution (linuxserver/wireguard) but I couldn't get ipv6 working... but thanks to this tutorial, I have all my traffic going through a linode VPS in NJ now!

  49. AVC

    The section "Adding more clients" lacks description regarding public and private keys, for example a command on how to display/get/generate it.

  50. Zachary Dummpfiff

    This is the best and most understandable guide about Wireguard on the whole Internet, and I've read a lot of them. Thanks!!

  51. Paul Springer

    Thank you so much for your detailed guide. WireGuard needs a site-to-site OpenVPN replacement. I have two Raspberry Pis running raspbian. None of them are gateways. Is this possible with a wire guard? All the devices on both remote sides can see each other?

  52. Kenny Bruce

    I have installed wireguard using your script. I then noticed my server was returning an error during the install. Could you have a check as I am a complete newbie to linux. I started using it last week

    • Applying /etc/sysctl.d/30-openvpn-forward.conf ... net.ipv4.ip_forward = 1
    • Applying /usr/lib/sysctl.d/50-default.conf ... net.ipv4.conf.default.promote_secondaries = 1 sysctl: setting key "net.ipv4.conf.all.promote_secondaries": Invalid argument net.ipv4.ping_group_range = 0 2147483647 net.core.default_qdisc = fq_codel fs.protected_regular = 1
  53. titan

    Very useful script! I've installed it correctly on Ubuntu 20.04. But it stopped working a few days ago after I create a peer form my dd-wrt router. Now I can't connect from any client, windows, android, etc.. If I do "watch wg show" it shows the client public IP, and is receiving and sending data. But the client can not access internet, not even ping the server. Any clue?

  54. PMan

    Thank you for a fantastic writeup and install script. I was up and running in 10 minutes

  55. mittorn

    "net.ipv6.conf.all.forwarding=1"

    This killed my server forever. I cannot access OCI because it blocked access for russian accounts and server is down Can you register new oracle always free tier for me?

  56. hari

    Thank you for this!

  57. Andi F.

    I am running an AVM Fritz!Box router on a Dual Stack Lite internet connection. With the latest firmware the router now supports VPN connections via wirdguard and automatically creates a dynDNS entry via its myFritz service and even generates an qr code for client connection. Great so far. But I am failing to connect with the wireguard android app to the hostname specified Endpoint. As I found out this is because the myFritz hostname has an A & AAAA record and the App only tries to connect to the resolved IPv4 and not to the IPv6 address. Entering the current IPv6 as Endpoint would work for now, until the address prefix will change. So its fact that wireguard prefers IPv4 over IPv6! There are many threads online pointing to that issue, most many years age and still no solution to that.

  58. h4cd

    thanks, it's the best post about configuration of wireguard in the whole world.

  59. David Garcia

    I managed to get it working on RHEL 8.9